Monday 22 October 2018

Temple of Airjitzu (70751) - Finishing off the Blacksmith Shop

This past weekend, we finished off the blacksmith shop, putting the roof and the vegetation in place.

We've got the same dried out stalks sitting at the edge of the water but at least we have some trees near this building which gives it some great contrasting color as well as shapes. I really like the curved tree trunks.


From the rear, you can see the chimney that leads from the forge all the way up through the ceiling of the upper level. The upper level seems just to be an empty storage area, although how one would access it is beyond me as there are no stairs. Then again, everything living here is a ninja so they probably just scale the trees and jump through the windows.


 It looks like the trees have dropped some flowers or buds onto the roof of the smithy.


Something I really like about the smithy is the way the roof comes apart. In addition to being able to remove the second level entirely, the roof was also designed in a clamshell manner so that it could easily be opened up for placement of minifigs and other props. The "claws" on each half of the roof are offset in order to form interlocked shingles when both sides are closed.

Temple of Airjitzu (70751) - Starting on the Blacksmith Shop

With the market building complete, we move onto the second building, which is a blacksmith. I mean, what else would a community of ninjas need besides food? Weapons, of course!

 The smithy has everything you would expect - a large anvil, a bucket of water for cooling, a bin full of tools and a mug of refreshment for the smith.


In this view, you can see the other side of the shop, which includes a work area with lamp in the far corner, presumable for doing more detailed work like inscriptions. Nearer to us is the forge, complete with a roaring fire.


Here is a better look at the forge. Is is vented by a large chimney that extends up through the ceiling.


The outside of the smithy is quite plain, with only a hanging sign giving any signal of what lays within (assuming of course that the pounding of metal didn't give it away).


Again, you can see the stepping stones that lead away from the shop, presumably to a bridge that joins the smithy to the market place.


Temple of Airjitzu (70751) - Finishing off the Marketplace

It's been quite a while since I updated here - not because we haven't been diligently working on the set but because I just haven't gotten around to doing the updates.

We did finish off the marketplace building a couple weeks ago. True to Ninjago fashion, there were weapons hidden in obscure places. In this case, two chests full of shurikens and swords were hidden in the archway above the main entrance to the market.


You can see how they were skillfully hidden in the architecture to appear like part of the structural design.


If you didn't know to look for them there, you would hardly notice them at all.


The roof of the marketplace is again very typical Ninjago, with the slotted roll up theme. Definitely a favorite or ours as it evokes a very Asian (specifically Japanese) feel to the set. Adding to this are the ornamental gongs that hang from the roof peaks.


I think the fishing poles are a nice touch to the scene, though I have to admit that I have never heard of crabbing with a fishing pole. Must be an ancient ninja secret technique! The stepping stones (which I think lead to a bridge) also add some realism to the scene, as do the two small statues that frame the store entrance.


I am not a huge fan of the vegetation by this building. Given that it is situation on the shore, I should think that the soil is quite wet, meaning dense shrubbery or at least some cat tails. The vegetation provided looks more at home in a desert - there are no flower, no leaves, just a couple of dried out looking stalks.


There are a couple more weapons that have been skillfully worked into the architectural design. You'll notice that it is actually a pair of naginata being used as the poles to hold up the lanterns and the store signs.


Monday 1 October 2018

Temple of Airjitzu (70751) - Our Next Project!

This is always the most exciting part of starting a new build - the UNVEILING!

Next up, we return to our Ninjago sets, continuing on with the Temple of Airjitzu. This set is now retired and we were lucky enough to pick it up right before retirement at our local Lego store. It wasn't even on our radar as something we wanted to build but it caught our eye as we browsed around. It was the second last set in the store and was even on sale as it was close to retiring. Definitely a good buy!


From the box itself, you can tell that it continues with the high amounts of detail that we've come to love and expect from Ninjago series sets. There are a plethora of mini-figures (12 I believe) which is really spectacularly for a relatively small set like this one.

It didn't take long for our expectations to be met. We started off building one of the smaller buildings (the one on the right side of the temple) and immediately got a sense of the detail and the overarching Japanese theme of the set.

The building is clearly a marketplace. On one side of the shop are baskets of baked goods - a variety of baguettes in a large bread crate, a basket full of either cookies or mini-pies and another basket filled with bars of some type (maybe chocolate bars?).


 On the opposite wall is a crate of apples - both green and red - and a barrel of fish with a large sink where you can rinse off your fruit or clean your fish before heading home.


In true Asian fashion, the market also has live chickens that you can buy and take home for supper. YUM!


This all fits into a fairly compact area. The 2 anchoring studs right by the chickens leads me to believe that this building connects up to something else. What, exactly, remains to be revealed ...


Statue of Liberty (21042) - Final Thoughts

This set was a pretty big departure from the sets we normally tackle. We've never been much interested in doing any sort of architectural sets. However, it was a good experience to try it out and see what we've been missing (or not missing haha).

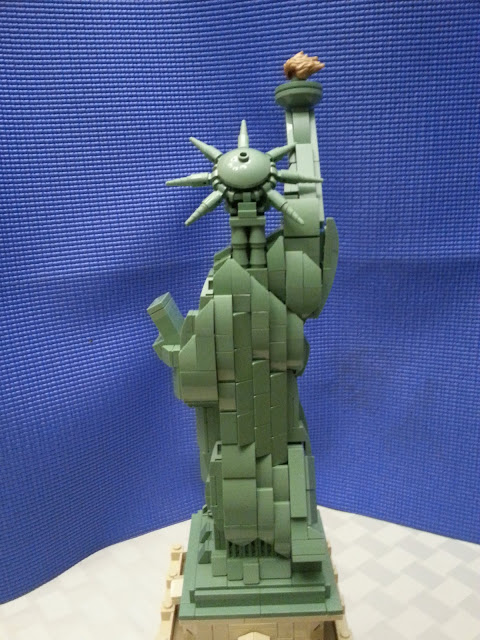
Overall, we were fairly impressed with how well the Statue of Liberty was captured - not easy to do considering how small scale the model is compared to the actual statue. One area that we would have liked more detail on was the face. In the model, it is simply a flat tile piece and I think so much more could have been done with that as the face is pretty central to any humanoid model.

The use of the mini-figure hairpiece for the torch was ingenious and a great way to avoid having to make a new piece while still capturing the flickering flame effect.

All-in-all, it was not a bad build. The base was pretty straight forward while the body of the statue proved to be more of a challenge and required some diligence to detail.

That being said, I don't think we will do another architecture series set. From what I've seen, the facades tend to be quite smooth and not really accentuating too much intricate detail (unlike something like Ninjago City for instance). However, if you are a fan of various famous landmarks and buildings, the architecture series could be your cup of tea.

We finish off this post with views of the set from all 4 angles.


Statue of Liberty (21042) - The Lady is Done!

We polished off the last bit of the statue and got her all ready for display! Given how small the scale is on this model, the final rendition is actually surprisingly detailed. The last "side" of the body went quite smoothly, maybe because mom had gotten used to the mounting of the pieces or maybe it just happened to be the easiest of the sides.


Here is the lady with the iconic tablet and torch (which is actually a blonde-gold hairpiece from a minifigure haha).


Thursday 27 September 2018

Statue of Liberty (21042) - Starting on the Statue

Mom has decided that she is taking back her earlier statement about how much easier this set is than the DB5 Aston Martin.

While it definitely started off as a mind-relaxing excursion with the base, it's definitely morphed into a build that requires a lot of attention to detail when building the statue itself.

The color is the same for every piece and while the overall shape is clearly that of the Statue of Liberty, it is difficult to know just by looking at an individual piece where it should go. Those things combined mean a lot of diligence is required to ensure that all the pieces go in the right place.

The pieces get put together into "sub-blocks" which then get attached to the long studded pillar that you previously saw. This makes it a little easier to build vs attaching the pieces individually to the structure.

You can see below that it is starting to take shape quite nicely. Pictured is the back of the statue.


Here is a bit of an angled shot that shows the back (to the left) and the right side of the statue.


And here is the front. Again, you can see the studded structure that the curved statue pieces attach to.


Sunday 23 September 2018

Statue of Liberty (21042) - Reaching new heights!

We made a big push on the build yesterday after having neglected it for a couple weeks. Not only did we finish off the "base" but we started on the structure of the statue itself though it doesn't look like much at this point.

 The 3rd level of the base continues with the familiar detailing and shapes that we have seen thus far. The corner columns are even taller with this level and there is another balcony/viewing area above.


Seeing the entire base together is quite impressive. Mom was excited to move from the beige brick to the tarnished green layers.


And here you can see the beginnings of the statue itself, starting with the structure around which it will be built.


Statue of Liberty (21042) - Another layer up

The set seems so simple and straight forward after the rigors of the DB5. It's almost as if the brain can go on autopilot instead of having to focus intensely on the task at hand!

The detailing on the set continues to be a pleasant surprise. We added the next layer to the base, this one with more detailing than the foundation. Where the brick detailing of the base came mostly from the patterns that were carved into the pieces, the detailing on this level comes instead from the use of many small, differently shaped pieces that were combined to give the overall effect.

Along the corners, you can see the use of alternating rectangular and circular pieces to provide the recessed column look while running along the base of this second level are alternating triangular and sloped pieces.


Again, the middle continues to be hollow. It's a good thing the hole extends all the way to the bottom as pieces simply tumble down onto the table when they get fat-fingered and dropped.


Tuesday 4 September 2018

Statue of Liberty (21042) - Unveiling

As you may have guessed from the title, our next build is the Statue of Liberty! Thanks so much to Dave for this set. As we were working on the James Bond DB5 for him, he went on vacation to New York and was kind enough to pick this set up as a momento for us.

It's the first Architecture set that we have ever built and definitely an iconic one. At 1685 pieces, it's one of the smaller sets we have done.


Thus far, the build has gone very smoothly. After all the moving parts of the James Bond car, that isn't a surprise! I think this is a good breather for the intense concentration that was needed for that set!

We managed to get a lot of the foundation done over the weekend. The detailing is true to form and looks true to form.


The interior of the base is hollow, which will cut down on the finished weight of the set. I also appreciate the use of some colors with the internal pieces. The colors definitely help you to locate where additional pieces need to go and overall makes the build easier.


James Bond DB5 (10262) - Final Thoughts

Well, with the completion of the build comes time for reflection. Lego did a great job with this set. Visually, it looks very close to the real life version of the car. And the little tricks and gimmicks they included were well executed and true to the movies.

My favorite of the features has to be the ejection seat - the mechanics were cleverly integrated into the vehicle and work so smoothly. The seat gets some very impressive air when launched - it had to be at least a foot of travel.

Other neat gadgets include the extendable bullet shield, the hidden machine guns that rotate in and out with the running lights and the rotating license plate holders. I was also very impressed with the detail in the engine of the car.

If there is something I need to pick on as a critique, it is that the retractable roof segment does not sit perfectly flush with the rest of the roof. So, if you know what you are looking for, it's quite evident that there is something going on there. You can see in the picture below that there is a square that seems to be slightly elevated from the roof.


Aside from that though, this build is spot on. It's full of interesting gadgets and features and it is a MUST HAVE for any James Bond fan. Be aware that novice builders may have difficulty though. Lego wasn't joking around when they classified this as an expert set. As with many other builds that have a lot of moving parts, some portions of the build are tricky and if you aren't paying complete attention, it is very easy to miss something only to realize it later and have a lengthy fix ahead of you.


James Bond DB5 (10262) - Off the assembly line and ready for action!

This weekend proved to be a productive one as we finished off the James Bond DB5. I presented it to Dave not too long ago and he was thoroughly pleased with it!

Lego certainly saved the best for last as we got to build (and play with) the ejection seat. It launches the seat an impressive distance into the air! It's also very easy to reload the seat and reset the roof for the next unfortunate passenger.

A significant portion of the roof folds away, leaving lots of room for the seat and its occupant to take a little ride. The mechanics are very fluid - pulling back on the activation lever (which is cleverly hidden as part of the bumper) retracts the roof while pushing it back into position launches the seat into the air.


We also installed the tire shredders onto one side of the vehicle - they sure do look menacing!


This is going to look great on display at Dave's house. I can't wait to see pictures of it on his TV stand!

And Dave, remember that if you ever decide to expand your Lego collection in any way, we are happy to help you out! Tell your friends!

Friday 31 August 2018

James Bond DB5 (10262) - The Hood and Trunk Go On

We did a little more work on this last, getting the hood and the trunk on. It is really starting to look like a car now!

Here is a shot from the front - clearly recognizable is the Aston Martin logo on the prow of the hood as well as the air scoop that runs down the middle.


True to form to its real-life counterpart, the hood opens from the "back", swiveling at the front end. The opening and closing mechanism is very smooth and the hood stays open on its own.


We also did some work on the rear end of the car, getting the trunk in. Again the Aston Martin logo is prominently displayed.


As with the license plate holder on the front of the car, the one on the rear is also capable of flipping through all 4 of the plates. Below is a shot of it in mid change.


The trunk (or boot as the Brits would call it) is quite spacious. The only things currently in the trunk are 2 black pieces - I am not sure what they meant to be but they are the same pieces as those used on the machine guns. Perhaps they are replacement barrels?


Last but not least is the bullet shield - highly useful when Bond is being chased by the bad guys. With a clockwise twist of the right side "tailpipe", the shield extends to cover the rear windshield. Twist the pipe counter-clockwise and it retracts back into its slot.


Monday 27 August 2018

James Bond DB5 (10262) - Engine, headlights and machine guns oh my!

This weekend's building unveiled more cool features of the Bond car. In addition to completing the engine compartment - which includes a pretty good depiction of the engine block, we also completed the front end of the car, including the grill and the running lights/machine guns.

As you can see, the engine compartment is convincingly packed with complex looking machinery. The engine even has the pistons showing and is a pretty good rendition of the inline-6 engine of the actual DB5 car. On the right side of the engine block, you can see the 6 headers of the exhaust manifold (again cannon to the real life DB5) and to the left are the 3 fuel filters and associated connections to the engine block. 

I certainly hope I have identified these components correctly as I am definitely not a gear head!


Next on the cool list are the running lights, which flip to reveal dual machine guns! Definitely handy in a villain chase! The flipping is accomplished using the gear shift lever by the driver's seat. Here is the car in "civilian" mode, looking perfectly harmless.


And then suddenly BAM! You've got twin machine guns spitting lead at you!


With that, we finished chapter 3 of the build. Chapter 4 is the last section, so expect a few more cool tricks that this car up its sleeve!